3. Classroom Smart Temperature & Humidity Meter
Let’s build an intelligent temperature and humidity monitoring system with an AHT20 temperature and humidity sensor and an OLED. It will display environment data in real time to create a comfortable and healthy learning environment for teachers and students!
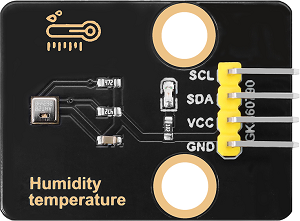
3.1 AHT20 Temperature and Humidity Sensor
Based on the principles of capacitive humidity and thermistor temperature measurement, the AHT20 can detect the environment temperature and humidity in real time and then output the data through the I²C interface, which provides precise data support for environment monitoring and smart control.
Parameters
Operating voltage: DC 3.3-5V
Communication interface: I2C
I2C address: 0x38
Temperature range: -10°C ~ +50°C
Humidity range: 0% ~ 100% RH
Dimensions: 32 x 23 x 8mm
Positioning hole: Diameter of 3.2mm
Interface: 4-pin curved pin interface spacing 2.54mm
Principle
AHT20 principles of capacitive humidity and thermistor temperature measurement:
Humidity measurement: The humidity changes in the air are detected by capacitive sensor, and the capacitance value will vary with the humidity.
Temperature measurement: The ambient temperature is detected by a thermistor, and the resistance value changes with the temperature.
Digital output: The sensor integrates an ADC (analog-to-digital converter) and a calibration circuit, which converts analog signals into digital signals and outputs them by I²C interface.
Test Code
#include <Wire.h>
#include <AHT20.h>
AHT20 aht20;

void setup()
{
  Serial.begin(115200);

  Wire.begin(); //Join I2C bus
  //Check if the AHT20 will acknowledge
  if (aht20.begin() == false)
  {
    Serial.println("AHT20 not detected. Please check wiring.");
    while (1);
  }
  Serial.println("AHT20 acknowledged.");
}

void loop()
{
  //Get the new temperature and humidity value
  float temperature = aht20.getTemperature();
  float humidity = aht20.getHumidity();

  //Print the results
  Serial.print("Temperature: ");
  Serial.print(temperature, 2);
  Serial.print(" C\t");
  Serial.print("Humidity: ");
  Serial.print(humidity, 2);
  Serial.print("% RH");

  Serial.println();

  //The AHT20 can respond with a reading every ~50ms. However, increased read time can cause the IC to heat around 1.0C above ambient.
  //The datasheet recommends reading every 2 seconds.
  delay(2000);
}
Code Explanation
1. Hardware and library
#include <Wire.h>
#include <AHT20.h>
AHT20 aht20;
Import I²C communication library and AHT20 sensor library, create an AHT20 object and name it
aht20for operating the sensor.
2. Initialization(setup)
void setup()
{
  Serial.begin(115200);

  Wire.begin(); //Join I2C bus
  //Check if the AHT20 will acknowledge
  if (aht20.begin() == false)
  {
    Serial.println("AHT20 not detected. Please check wiring. Freezing.");
    while (1);
  }
  Serial.println("AHT20 acknowledged.");
}
Initialize serial communication (115200 baud rate)
Initialize the I2C bus
Check whether the AHT20 sensor is connected properly
If the detection fails, the program will stop and prompt to check the wiring
If it is detected, a confirmation message will be displayed
3. Main Loop (loop)
aht20.getTemperature()
aht20.getHumidity()
Read the current temperature value and return a floating-point number (unit: °C);
Read the current humidity value and return a floating-point number (unit: % RH).
void loop()
{
  //Get the new temperature and humidity value
  float temperature = aht20.getTemperature();
  float humidity = aht20.getHumidity();

  //Print the results
  Serial.print("Temperature: ");
  Serial.print(temperature, 2);
  Serial.print(" C\t");
  Serial.print("Humidity: ");
  Serial.print(humidity, 2);
  Serial.print("% RH");

  Serial.println();

  //The AHT20 can respond with a reading every ~50ms. However, increased read time can cause the IC to heat around 1.0C above ambient.
  //The datasheet recommends reading every 2 seconds.
  delay(2000);
}
Read the current temperature and humidity data and return a floating-point number.
Output the format data through the serial monitor.
In the
Serial.print(temperature, 2);,2indicates that the value is retained to two decimal places.Delay 2 seconds (the minimum read interval recommended in the sensor data manual).
Test Result
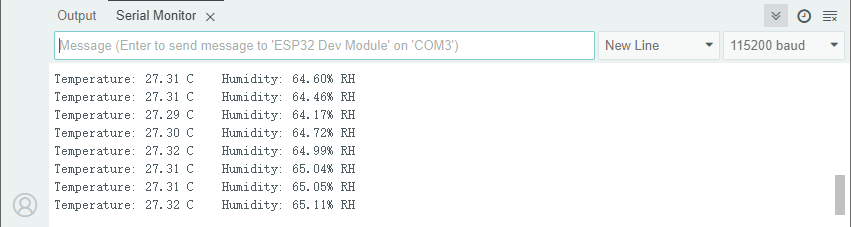
After uploading the code, open the serial monitor and set the baud rate to 115200. The temperature and humidity values will be updated every two seconds.
3.2 1.3-inch IIC OLED Display
OLED display adopts a self-luminous display DS technology. It features high contrast, wide viewing Angle and low power consumption and can show clear images and text. So it is widely used in smart devices, wearable devices and industrial control and so on.
==图==
Parameters
Operating voltage: DC 3.3-5V
Driver chip: SH1106
Communication interface: I2C
Resolution: 128*64
Dimensions: 37 x 34 x 6mm
Positioning hole: 30.5mm(length) * 29mm (width)
Interface: 4-pin curved pin interface spacing 2.54mm
Principle
OLED working principle
Self-luminescence : Each pixel of the OLED is composed of organic luminescent materials. When current passes through, pixels emit light without backlighting.
Pixel Control : By controlling the current of each pixel, their brightness can be adjusted, thereby achieving image display.
Driver Chip : Built-in driver chip SH1106 is responsible for receiving control signals and driving pixels.
OLED control principle
The control principle of OLED is based on video memory(GRAM) and communication protocols:
Video memory(GRAM):
The OLED is equipped with video memory for storing the current displayed image data.
The screen content can be updated by writing data to the video memory.
Communication protocol:
Commands and data are sent through the I²C interface to control the working mode and video memory content of the OLED.
Common commands include initialization, screen clearing, cursor position setting, data writing, etc.
Test Code
#include <Wire.h>
#include <Adafruit_GFX.h>
#include <Adafruit_SH110X.h>

// OLED configuration
#define SCREEN_WIDTH 128
#define SCREEN_HEIGHT 64
#define OLED_RESET -1  // Share I2C reset
#define I2C_ADDRESS 0x3C  // Default address of SH1106

// Create a display object
Adafruit_SH1106G display(SCREEN_WIDTH, SCREEN_HEIGHT, &Wire, OLED_RESET);

void setup() {
  // Initialize the serial port
  Serial.begin(115200);

  // Initialize OLED
  if(!display.begin(I2C_ADDRESS, true)) {  // true is 128x64 resolution
    Serial.println("SH1106 initialization failed");
    while(1);  // Stuck and not continuing
  }

  // Clear the screen and set the text properties
  display.clearDisplay();
  display.setTextSize(1);      // text size
  display.setTextColor(SH110X_WHITE);  // Monochrome display
  display.setCursor(10, 25);   // Set the starting position (center)

  // show "Hello world!"
  display.println("Hello world!");

  // Update display
  display.display();
}

void loop() {
  // There is no need for looping content
  delay(1000);
}
Code Explanation
1. Hardware and library
Header file import
#include <Wire.h>               // I2C communication library
#include <Adafruit_GFX.h>      // Adafruit graphics core library
#include <Adafruit_SH110X.h>   // SH1106 dedicated driver library
OLED parameter configuration
#define SCREEN_WIDTH 128       // Screen width (pixels)
#define SCREEN_HEIGHT 64       // Screen height (pixels)
#define OLED_RESET -1          // Reset pin (-1 indicates shared I2C reset)
#define I2C_ADDRESS 0x3C       // I2C device address (7-bit address)
Create a display object
Adafruit_SH1106G display(SCREEN_WIDTH, SCREEN_HEIGHT, &Wire, OLED_RESET);
2. Initialization(setup)
void setup() {
  // Initialize the serial port
  Serial.begin(115200);

  // Initialize OLED
  if(!display.begin(I2C_ADDRESS, true)) {  // true is 128x64 resolution
    Serial.println("SH1106 initialization failed");
    while(1);  // Stuck and not continuing
  }

  // Clear the screen and set the text properties
  display.clearDisplay();
  display.setTextSize(1);      // text size
  display.setTextColor(SH110X_WHITE);  // Monochrome display
  display.setCursor(10, 25);   // Set the starting position (center)

  // show "Hello world!"
  display.println("Hello world!");

  // Update display
  display.display();
}
Initialize the serial communication
Initialize OLED
Configuration displays parameters
Output “Hello world!”
Update display content
3. Main Loop (loop)
delay(1000);
delay(1000)pauses execution for 1 second to prevent it from idling too frequently.
Test Result
After uploading the code, you can see “Hello world!” in the middle of the OLED screen.
==图==
The display content will be refreshed every 1000 milliseconds.
FAQ
The code upload failed?
Make sure the library files are added
Make sure the IIC wiring is correct
3.3 Smart Temperature & Humidity Meter
In the previous study, we have become familiar with the text display of OLED and mastered the data acquisition method of the AHT20 sensor. Now, let’s deeply integrate these two to create a temperature and humidity meter!
Herein, we will build an intelligent monitoring station that can track the classroom temperature and relative humidity in real time. This system will clearly display them on the OLED:
Real-time temperature value (℃)
Current humidity percentage (%)
Now, let’s embark on this practical journey of environment perception!
Code Flow
        graph TD
    A[START] --> B[Initialize the hardware]
    B --> C{AHT20 & OLED<br> initialized?}
    C -->|YES| D[Show initialization interface]
    C -->|NO| E[Report an error and stop]
    D --> F[Main loop]
    F --> G{1 second later?}
    G -->|YES| H[Read the data and refresh the display]
    H --> F
    G -->|NO| F
Test Code
#include <Wire.h>
#include <AHT20.h>
#include <Adafruit_GFX.h>
#include <Adafruit_SH110X.h>

// OLED configuration
#define SCREEN_WIDTH 128
#define SCREEN_HEIGHT 64
#define OLED_RESET -1
#define I2C_ADDRESS 0x3C

Adafruit_SH1106G display(SCREEN_WIDTH, SCREEN_HEIGHT, &Wire, OLED_RESET);
AHT20 aht20;

// Last update time
unsigned long lastUpdate = 0; // Record last update time
const unsigned long updateInterval = 2000; // Update interval of 2 seconds

void setup() {
  Serial.begin(115200);

  Wire.begin();

  // Initialize the AHT20 sensor
  if(!aht20.begin()) {
    Serial.println("AHT20 not detected! Please check the wiring");
    while(1); // An error is reported only through the serial port
  }

  // Initialize OLED
  if(!display.begin(I2C_ADDRESS, true)) {
    Serial.println("OLED initialization failed");
    while(1); // An error is reported only through the serial port
  }

  // Clear the screen to display the initial information
  display.clearDisplay();
  display.setTextSize(1);
  display.setTextColor(SH110X_WHITE);
  display.setCursor(10, 30);
  display.println("Initializing...");
  display.display();
  delay(1000);
}

void loop() {
  if(millis() - lastUpdate >= updateInterval) {
    lastUpdate = millis();

    float temperature = aht20.getTemperature();
    float humidity = aht20.getHumidity();

    // Streamlined display updates
    display.clearDisplay();
    display.setTextSize(1);

    // Draw the title bar
    display.setTextSize(1);
    display.setCursor(0, 0);
    display.println("Hygrothermograph");
    display.drawLine(0, 10, SCREEN_WIDTH, 10, SH110X_WHITE);

    // Temperature display (optimized symbol display)
    display.setCursor(0, 25);
    display.print("T: ");
    display.print(temperature, 1);
    display.cp437(true);
    display.write(248); // °
    display.println("C");

    // Humidity display
    display.setCursor(0, 45);
    display.print("RH: ");
    display.print(humidity, 1);
    display.println("%");

    display.display();
  }
}
Code Explanation
1. Hardware configuration and timing control module
Hardware initialization
#include <Wire.h>
#include <AHT20.h>
#include <Adafruit_GFX.h>
#include <Adafruit_SH110X.h>

// OLED configuration
#define SCREEN_WIDTH 128
#define SCREEN_HEIGHT 64
#define OLED_RESET -1
#define I2C_ADDRESS 0x3C

Adafruit_SH1106G display(SCREEN_WIDTH, SCREEN_HEIGHT, &Wire, OLED_RESET);
AHT20 aht20;
Timing control variable
unsigned long lastUpdate = 0; // Record last update time
const unsigned long updateInterval = 2000; // Update interval of 2 seconds
Update every 2 seconds, following the minimum read interval recommended by the sensor data manual.
2. Initialization(setup)
void setup() {
  Serial.begin(115200);

  Wire.begin();

  // Initialize the AHT20 sensor
  if(!aht20.begin()) {
    Serial.println("AHT20 not detected! Please check the wiring");
    while(1); // An error is reported only through the serial port
  }

  // Initialize OLED
  if(!display.begin(I2C_ADDRESS, true)) {
    Serial.println("OLED initialization failed");
    while(1); // An error is reported only through the serial port
  }

  // Clear the screen to display the initial information
  display.clearDisplay();
  display.setTextSize(1);
  display.setTextColor(SH110X_WHITE);
  display.setCursor(10, 30);
  display.println("Initializing...");
  display.display();
  delay(1000);
}
Complete all hardware initializations
Display the start-up message “Initializing…” on the OLED.
display-println() only modifies the image data in memory. The display will be actually updated only after calling display().
3. Main Loop (loop)
Timing control
if(millis() - lastUpdate >= updateInterval) {
  lastUpdate = millis();
  // ...Subsequent code
}
Realize non-blocking timing sampling
Update the data once every
updateInterval(1000ms)Use
millis()for timing to avoid program blocking caused bydelay()lastUpdaterecords the timestamp of the last update
Sensor data acquisition
float temperature = aht20.getTemperature(); // Obtain temperature (unit: ℃)
float humidity = aht20.getHumidity();     // Obtain humidity (unit: %RH)
OLED display update
    // Streamlined display updates
    display.clearDisplay();
    display.setTextSize(1);

    // Draw the title bar
    display.setTextSize(1);
    display.setCursor(0, 0);
    display.println("Hygrothermograph");
    display.drawLine(0, 10, SCREEN_WIDTH, 10, SH110X_WHITE);

    // Temperature display (optimized symbol display)
    display.setCursor(0, 25);
    display.print("T: ");
    display.print(temperature, 1);
    display.cp437(true);
    display.write(248); // °
    display.println("C");

    // Humidity display
    display.setCursor(0, 45);
    display.print("RH: ");
    display.print(humidity, 1);
    display.println("%");

    display.display();
Screen initialization
Draw the title bar
Temperature and humidity display
Screen refresh
Test Result
After uploading the code, AHT20 sensor reads the temperature and humidity values every 2 seconds and displays them on the OLED.
==图==